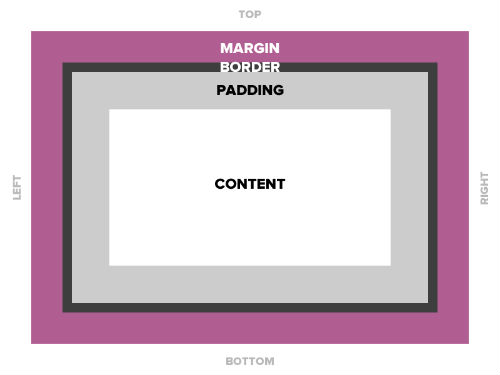
Today’s Goals:
- Learn about the CSS box model
Today’s Featured Site:
- http://willthefuturebeaweso.me/– Find out now!
About the CSS Box Model
- We are going to first create paper box models to serve as a visual guide. We will create a page wrapper and will also add an image to show how each of these things can have margins, a border, and padding.
- Let’s check out this cool online, interactive box model demonstration
- The box model can be applied to every element on your page. You can choose to define margins, borders, and padding for everything. You can also add a background color or background image to every element.
- Wait, what are elements again?
- Why is it important and useful to apply the box model to every element?
- The box model can also be used to define a page wrapper, as we did last week with our practice webpage. Keep this in mind as we move forward and learn how to create different sections of a webpage, such as a header, footer, and sidebar. As we define and position these sections, we can use the box model to help with margins, borders, and padding.
- About that div id below your body tag– what is it?
- Div ids are preceded by # on a style sheet. They are used to identify specific sections of a webpage (ex. wrapper, menu, header, sidebar).
- Divs are applied in the HTML to refer to specific sections of a page, for example, div id=”wrapper”. Everything in that div will have the properties defined for it in the style sheet, such as a certain background color, background image, font, border, etc.
- Elements are the various HTML elements, such as paragraphs, headlines, links, etc., that are defined by the style sheet and they are not preceded by anything on a style sheet.
- Box model practice
- Open Notepad++ and go to the webpage we started last week with the wrapper. Let’s add an image and a headline and give them margins, a border, and some padding. We can use this image.
- Some other border-styles to try: solid, dashed, double, groove, ridge, inset and outset.
