Today’s goals:
- Continue learning and practicing the CSS box model
Today’s featured website:
- http://cssstats.com/– This site will give you a CSS summary of any website you want
About the CSS Box Model
- The box model can be applied to every element on your page. You can choose to define margins, borders, and padding for everything. You can also add a background color or background image to every element.
- Wait, what are elements again?
- Why is it important and useful to apply the box model to every element?
- The box model can also be used to define a page wrapper, as we did yesterday with our practice webpage. Keep this in mind as we move forward and learn how to create different sections of a webpage, such as a header, footer, and sidebar. As we define and position these sections, we can use the box model to help with margins, borders, and padding.
- About that div id below your body tag– what is it?
- Div ids are preceded by # on a style sheet. They are used to identify specific sections of a webpage (ex. wrapper, menu, header, sidebar).
- Divs are applied in the HTML to refer to specific sections of a page, for example, div id=”wrapper”. Everything in that div will have the properties defined for it in the style sheet, such as a certain background color, background image, font, border, etc.
- Elements are the various HTML elements, such as paragraphs, headlines, links, etc., that are defined by the style sheet and they are not preceded by anything on a style sheet.
CSS Box Model Practice
- Do:
- You are going to download new code, start a new page in Notepad++, and practice applying the box model to everything on that page.
- The box model can be applied to every element on your page. You can choose to define margins, borders, and padding for everything. You can also add a background color or background image to every element.
- To begin:
- Download this starter code
- Open Notepad++ and start a new webpage (File, New)
- Copy and paste the code into the new webpage and save it as cssboxmodel.html
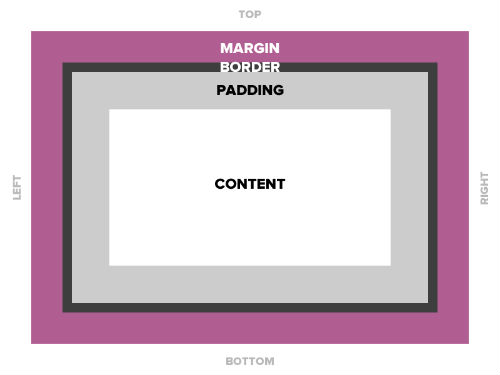
- Remember: every element can have MARGINS (top, right, bottom, left), BORDERS (visible or invisible; visible border can have different styles, colors, and thickness), and PADDING (how much breathing room is around the element in pixels).
- Now, on your new webpage, give each element DIFFERENT properties for margins, borders, and padding. You will also give them background colors. Do this by changing the values you are given in your starter code.
- Border styles: solid, dashed, double, groove, ridge, dotted, inset and outset
- Color site: http://materialuicolors.co/
- Add a new paragraph (just type your name in some p tags). What happens? Why?
- Why does the link to YouTube have the same properties as the paragraph? How can you fix it so the link fits inside the box?
- Can you add a background image to any of these elements? How? See if you can do it by copying and pasting the background image code from your other CSS practice page into this new webpage in the right location. You will need three lines of code for it to work- the background image url, background-repeat, and background-position.
- Grab the image code from here and paste it in your internal style sheet below your paragraph section and above your link section. What happens to your image?
- Reverse the opacity of your image so when you roll your mouse over it, the image is fully visible, and when you take your mouse away, it’s nearly transparent.
- Finally, add another headline, a smaller one, h2. First, add h2 tags in your HTML below your image. Type “this is my smaller headline.” Then, go into the CSS and copy and paste your h1 section. Change h1 to h2 and change up all of the style values.