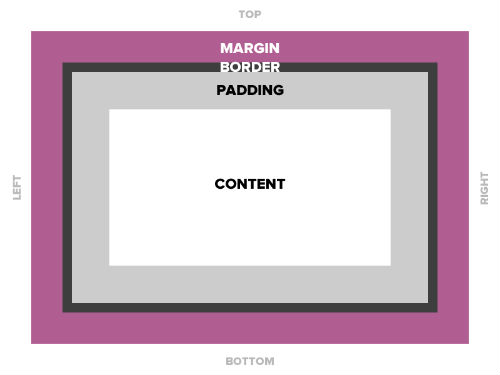
Today’s goals:
- Continue learning the CSS box model by creating a new webpage
- Learn how browsers compute the width of content
- Learn about the opacity property
Today’s featured website:
- https://www.webdesignmuseum.org/– An online museum of web design
CSS Box Model Review
- How would you describe the box model in your own words?
- What are the three box model properties?
- True or false: the box model allows you to add a background color and background image to any element
- True or false: you can use height and width properties with the box model
CSS Box Model Practice
- From last Friday: start a new page in Notepad++ and practice applying the box model to everything on that page.
- New practice webpage:
- Download this starter code
- Open Notepad++ and start a new webpage (File, New)
- Copy and paste the code into the new webpage and save it as boxmodel2.html
- Remember: every element can have MARGINS (top, right, bottom, left), BORDERS (visible or invisible; visible border can have different styles, colors, and thickness), and PADDING (how much breathing room is around the element in pixels).
- Now, on your new webpage, give each element DIFFERENT properties for margins, borders, and padding. You will also give them background colors. Do this by changing the values you are given in your starter code. READ THE CSS COMMENTS!
- Border styles: solid, dashed, double, groove, ridge, dotted, inset and outset
- Color site: http://materialuicolors.co/
- Add a new paragraph (just type your name in some p tags). What happens? Why?
- Why does the link to YouTube have the same properties as the paragraph? How can you fix it so the link fits inside the box?
- Can you add a background image to any of these elements? How? See if you can do it by copying and pasting the background image code from your other CSS practice page into this new webpage in the right location. You will need three lines of code for it to work- the background image url, background-repeat, and background-position.
- Copy the image code from here and paste it in your internal style sheet below your paragraph section and above your link section. What happens to your image? New CSS- the opacity property.
- What type of selector is img:hover? Hint: it’s the same as when we style links. What is it called? What do you think img:hover means?
- Reverse the opacity of your image so when you roll your mouse over it, the image is fully visible, and when you take your mouse away, it’s nearly transparent.
- Content’s true width: Browsers add margins, borders, and padding to the width of content on a webpage. For example, content that is 100 x 100 pixels that has 5px margins, 2px border, and 3px padding is actually 100 + 5 + 2 + 3 + 3 + 2 + 5 = 120 width and 120 height.
- By default in the CSS box model, the width and height you assign to an element is applied only to the element’s content box. A special CSS property and value, box-sizing: border-box; has the browser include the padding and the border in the content’s width and height. Let’s check out some examples here.
- Launch your webpage in Google Chrome. Right click on the image and choose Inspect. In the small box on the right, you will see a box model of the paragraph. Roll your mouse over the margins, border, and padding to see how the browser is computing the actual width of our image. Look at the width and height values below.
- Let’s add box-sizing: border-box; to our img CSS and see how the changes the computed width.
- WHY does this matter in terms of sizing elements on your webpage?
