Today’s Goals:
- Learn about basic CSS layout using the box model
- Create a webpage and apply the box model to different elements
Today’s featured websites:
- http://weavesilk.com/ – Mesmerizing!
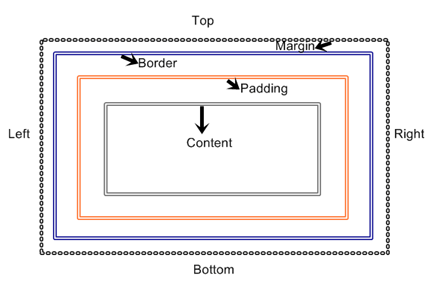
Key concept: All HTML elements have “boxes” around them that can be styled using CSS.
CSS Box Model Review
- How would you describe the box model in your own words?
- What are the three box model properties?
- True or false: the box model allows you to add a background color and background image to any element
- True or false: you can use height and width properties with the box model
CSS Box Model Online Exercises
- Online Exercises (do on your own and then review as a class)
-
Margin
4 margin exercises
REVIEW (helpful code here) -
Border
4 border exercises
REVIEW (helpful code here ) -
Padding
3 padding exercises
REVIEW (helpful code here ) -
Box model
4 Box model exercises
REVIEW (helpful code here )
-
Margin
CSS Box Model New Webpage
You’re going to style some quote text and a page wrapper by adding margins, borders, and padding. Notice how the quote is pushed down from the top of the page and from the left; you will have to figure out how to do that and what box model properties to use. Your end result should look close to this:

- Download this code and copy/paste into a new Notepad++ page. Save as quote2.html
- Style your #wrapper (inside style tags in head section)
Add a width of 1280px and a height of 853px
Add a border-width: 1px; border-style: solid; and border-color: gray;
Add margin-top: 0px; and margin-bottom: 0px;
Add margin-right: auto; and margin-left: auto; - Style your h1 headline for your quote text
Add padding: 5px;
Add margin-top and margin-left and figure out your own values (in pixels) so your quote is pushed down from the top and over from the left (use image above as a guide). - Style your p paragraph for the quote author
Add padding: 5px;
Add the same value for margin-left that you used for your h1 - Now go to your body section and add the correct div ID (see previous practice page for help). This is the only ID we are using on this page and you will find it in your CSS.
- Finally, add the correct closing tag before the closing body tag. Again, consult a previous practice page if you need to. This closing tag goes along with the div ID we used right after the opening body tag. These div tags are the page wrapper (the section we defined for all of our content; we’re defining an area in the browser for our webpage so we can layout our content inside of that area we defined and not just randomly inside the browser window).
