Today’s Goals:
- Learn about and practice CSS positioning: absolute, fixed, static, and relative. Learn about and practice using CSS classes.
Today’s Featured Site:
- https://jenniferdewalt.com/building_blocks.html– Use one of these blocks to demonstrate what your webpage looks like with a sidebar
Community PSA:
- Seeking snow shovelers! The Medford Senior Center is making a list of names & contact info to share with seniors in need of snow removal help this winter. When someone (a senior or other person in Medford) calls for shoveling assistance, payment (or volunteer hours) will be arranged between the shoveler and home/business owner. Please contact Syrah McGivern at the Board of Health smcgivern@medford-ma.gov or 781-393-2560 if you would like to be added to the snow shoveler list.
CSS Positioning
- Objectives: Learn about the differences among absolute, fixed, static, and relative positioning by adding differently positioned sections to our webpage. Continue practicing how to set up, add, and nest div tags.
- Last week you learned about absolute positioning and created a sidebar for your webpage. Let’s add some other divs to your webpage to see how different types of positioning work.
- Let’s grab some code from here
- Positioning divs on a webpage: Divs can overlap and are positioned either from the top left corner of the webpage (absolute) or in relation to their usual positions on the page (relative). Divs can also have a fixed position, which means they don’t move as you scroll along the page and stay in the same place. It is possible to put one div inside another and position them differently. Top, right, left, and bottom values are used to tell the browser where the div should be positioned on the page. The values can either be in pixels or as a percentage, which are relative to the parent element’s dimensions (example, a webpage that’s 900 pixels wide or a table that’s 500 pixels wide). Finally, static positioning is the default; it just means the content will appear however it’s added in the HTML.
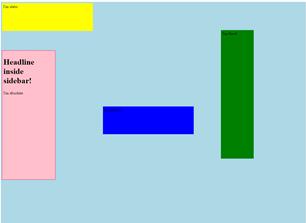
- Let’s add text inside each div. In the greenbox div, write I’m fixed (inside paragraph tags). In the yellowbox div, write I’m static. In the bluebox div, write I’m relative. In your sidebar div, write I’m absolute.
- Let’s cut and paste our sidebar div tags below everything else. What happens? Why?
- Let’s cut and paste the yellow and blue boxes and see what happens when we move them around in the HTML.
CSS Classes
- Objectives: Learn how to create and apply a CSS class.
- Classes are used in CSS to style multiple elements at once and contain several properties (such as text that’s bold, 16px and red). Classes are preceded by a . (period) on a style sheet.
- Let’s check out this CSS vocabulary summary to see classes, ID’s, and other selectors in action.
- The text on our page is hard to read. Let’s change that by creating 2 classes. Let’s create a class that can be applied to the paragraph tags in our sidebar and yellow box that will keep our text dark and a class we can apply to the paragraph in our blue and green boxes that will lighten the text so it’s easier to read.
- Classes can be called anything you want but it’s a good idea to keep it short and make it relevant to what you’re trying to do. We’ll create a class called dark since we want dark text in our light boxes. Add .dark and some curly brackets { } to your style sheet.
- Now let’s add a text color. Type color: purple; inside the curly brackets.
- Let’s add some other important styles. Add font-weight: bold; font-family: Consolas; and font-size: 20px;
- Now we must apply the dark class to the sidebar and yellow box. Click inside the first paragraph tag in your sidebar, hit the space bar, and type class=”dark”. Do the same for the yellow box.
- Let’s repeat the same process to create a light class for our blue and green boxes. What code should we copy and paste to begin? What should we change?